April 1, 2024

Improv strip blocks

 This hotel room carpet had me thinking of improv quilt blocks.


I thought this would be a good choice for our April quilt for the Bliss circle of Do Good Stitches.  Here's a tutorial for blocks inspired by this carpet.

Assembly of these blocks was quick and easy for me, but the key is to stay organized. I'll have a couple of suggestions for how to deal with this.

Start with two strips of fabric 7 inches by 20 inches (or longer); align one on top of the other, both with right sides up.


Make a series of random cuts, using the carpet photo as inspiration. Leave the first and last pieces a bit wider than the rest, to allow for joining blocks later. Try to keep your pieces more than a half inch wide to avoid losing bits in the seam allowance (although you might be ok with that).


It is critical to keep the pieces in order. One approach is to mark numbering on the pieces; I used a fine-point marker in the lower seam allowance.


Separate the two fabrics and number them correspondingly.


Now swap out alternate pieces.


Sew the pieces in order and you'll get two complementary blocks.


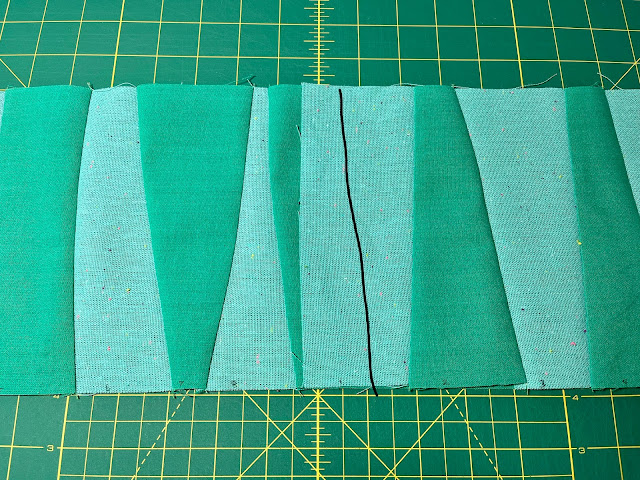
To join two blocks, overlap the ends and make another random cut as shown by the black line below. (Bliss members, you can skip this step.) This works best if there are an even number of cuts in the blocks.


Optionally, trim the blocks to 6.5" high to straighten the edges. (Bliss members, you can skip this step too.)

An alternate approach to staying organized is to make only one cut at a time (after the first two cuts) and sew together as you go, as illustrated in the following three photos.


When joining pieces, remember to line them up at the quarter inch point, not at the edge of the fabric.


This is my second pair of blocks:


These two photos show two options for joining a pair when they have an even number of cuts. Rotating the block on the right gives a slightly different look.


(My apologies for the poor color consistency of my photos. I know how to avoid this issue using my DSLR, but I don't know if it's possible on a cell phone camera.)

February 18, 2024

Main Event

I was quite happy with my Kaleidoscope Star quilt, although I didn't get the full effect I'd hoped for from the stripes. When I saw Tula Pink's neon stripes, they seemed to be a good fit for what I had in mind. So I tried a second version of the design, this time adding some applique.


I used a Broderie Perse approach for the applique, with fusible and raw edges.


My original vision for the giraffes was a bit different, but I had to make adjustments to work with the scale of the prints. The bias strip arc in the squares was not part of the original plan either. I had considered grouping a bunch of flowers as in the triangles, but that quickly became unwieldly in terms of layers and number of pieces. The arc is appliqued rather than pieced, primarily to get the stripes to rotate, but this was also easier than piecing.


The flowers and leaves come from a variety of (mostly) Tula Pink fabrics. The large flowers in the corners are from Moon Garden Kabloom fabric; I like how the petals and leaves echo the stripe motif.


I added just one bee.


The dark background fabric is Essex Yarn Dyed in charcoal. The backing is a larger scale version of the striped Kabloom flowers (with plenty of bees).


While these stripes are closer to what I had in mind originally for this design, they seem almost overpowering. I think the outside border is my favorite part of this quilt.


September 26, 2023

Kiwi Peel

 Introducing Kiwi Peel.


This quilt uses the same template shapes used in my Corona Wedding Dish quilt.  While that quilt used paper piecing for the melons, this time I had new laser-cut acrylic templates made for the melons, to go with the original templates for the centers. (Apologies for the poor photo.)


These shapes were originally inspired by an upholstery fabric.


For fabrics, I used a selection of cool(ish) colors from Alison Glass's Kaleidoscope yarn dyes. These colors were chosen in part to make use of leftovers from my Cosmic Curves quilt.


The backing is a print by e bond.


The quilting is all straight lines, 1/2 inch apart.  The green-centered circles are quilted with near-horizontal lines, randomly tilted between blocks, while blue-centered circles have near-vertical quilting.  This results in crosshatching in the melons.  I matched thread colors to the centers, without regard to the colors of the melons, so there are two thread colors in each crosshatched melon.


As I was assembling blocks together, I became concerned about being able to bind the deep inside corners. I decided to add small fillets to simplify the binding.


This idea for fillets was somewhat inspired by an old DWR quilt that was among my Dad's possessions. (I'm not sure of the origin of this quilt.)


More photos:


Now that I have a full template set, you're likely to see more quilts from me using these shapes.

July 6, 2023

Dogs in Pajamas

My wife's mother passed away in 2021. Tina asked me to make her a memory quilt using her mother's pajamas. Since I've heard numerous tales of the dachshunds Tina's family had as she was growing up, I thought of Elizabeth Hartman's Dogs in Sweaters quilt pattern.


 The sweaters are all made from pajamas.

The dogs' bodies, ears, and tails, and the background, are Essex linen.


The trim on the sweaters are mostly solid quilting fabrics, but in a few cases I used plaid pajama pieces for the trim.

I quilted different designs in each of the sweaters.

The back is entirely pieced from pajamas. The pajamas were all stretchy, so I applied interfacing to the pieces -- making for a heavy quilt.


I tried a chunky binding for the first time, using tutorials from Latifah Saafir and Audrey Esarey. I was aiming for a one-inch binding, but I didn't cut my strips quite wide enough. I had to trim a quarter inch from the quilt sandwich after I had sewn down the binding to the front, giving me a 0.75" binding.

I finished this quilt back in February, except the label I had ordered had a typo (my mistake). Here's the freshly added and corrected label:


 My mother-in-law was a very sweet woman, and I'm glad we have this memento to cherish.

July 3, 2023

Two gift quilts

I've recently completed two quilts which I've made for others.

My friend Joy Moore asked me to make her a memory quilt using her husband's shirts. I was pleasantly surprised to see a beautiful collection of bright plaids. Her husband Michael had great taste in shirts!


Joy wanted a large quilt with a traditional design. We settled on Arkansas Crossroads, which is a design I've used before.


The background fabric is Essex linen in flax. I alternated three different simple quilting designs in the 16-square blocks, and did a more intricate beaded design in the background. The background quilting is the same I used in my Xbox quilt, which I felt added much to that quilt.
 
 
For the backing, I used a Tim Holtz music-themed print, as Michael was a musician. The label was printed at Spoonflower.

I'm pretty sure Joy is quite thrilled and touched by her quilt.


My second recent completion was requested by our church as a tribute to Mr. Jerry Miller, a volunteer who retired last year after 60 years of service with the church's student ministries.

The quilt is made from Jerry's t-shirts associated with various youth activities or the group's yearly theme. I had the quilting done on a longarm machine at Sweet Home Quilting; my style of dense free-motion quilting doesn't seem well suited for t-shirt quilts.

Since Jerry had worked for NASA, we chose a fabric designed by astronaut Karen Nyberg for the backing, from her Earth Views line.


This was my first collage style t-shirt quilt. I used the layout steps from this tutorial as a guide; I borrowed their idea for a border as well. I cut my blocks at 5-inch increments (finished size) though. As a layout guide, I printed a grid on card stock and sketched in each t-shirt block to scale -- a 15"x15" block would be 3x3 squares on the grid, for example. 


I cut out the individual pieces and arranged them on another grid to determine my placement.


There was a big event last year to honor Jerry's retirement, but he was told at the time he'd have to wait for his gift -- since it required his involvement (in providing shirts and preferences). We presented the quilt to him at the student meeting last Sunday.


I just happened to finish both these quilts at about the same time. I pieced Joy's quilt first, and dropped it off at Sweet Home Quilting for basting on a longarm. While waiting for the basting, I was able to piece the t-shirt quilt. Then I left the t-shirt quilt to be quilted at Sweet Home while I did the quilting on Joy's quilt. By the time Joy's was complete, all that was left on Jerry's quilt was to add the binding and label.